AlcyonPDK User Guide
PDK tools at a glance
Alcyon’s PDK is designed to enable the user to build circuits by combining Alcyon’s building blocks with their own. For this purpose, the PDK incorporates tools that facilitate:
Building blocks creation: creating a new component is as easy as coding a
Drawer classin a single python file. TheDrawer classesare python classes containing the methods that build the shapes and stablish the contact points which make up the library’s components (pya.Cell). A separate python file is required for each component.Libraries creation: enables the user to create a library with just a few clicks. In order to populate the library you only need to add the python file with the
Drawer classin thedrawerssubfolder. Alcyon’s Technology Generation Tool will do the rest of the work for you, creating thePcell classesand registration scripts.Pcell classesare those python classes which inherit frompya.PCellDeclarationHelperand are registered by Klayout, thus making your building blocks available in the klayout’s library menu.PICs layout creation: Once the building blocks are avaible at the Klayout’s menu, they can be added to the current layout sheet by drag and drop. However, Alcyon has created the Layout-Creator Module to build circuits by scripting, taking building blocks from the different libraries and connecting them by following a netlist (see module’s documentation).
The users must follow the AlcyonPDK programing rules, which are deeply explained in this document.
NOTE: Documentation of the Modules available in the following directory:
~\KLayout\salt\AlcyonPDK_utils\python\doc
1. Custom Library Creation
This section describes how to create a new library in Klayout.
NOTE: Klayout Libraries can be also created from folders containing gds files, as long as those gds files contain cells that follow the same scheme as this PDK (pins, outline, silicon geometry, etc). The generation of GDS libraries is documented in the modules documentation
Commons module » GDS Library tools.
1.1. Run library creation workflow
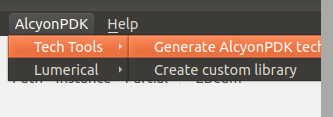
In Klayout’s menu tab go to:
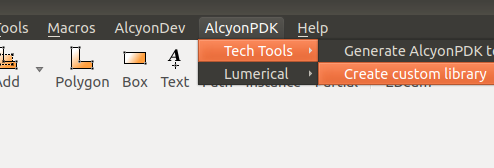
AlcyonPDK > Tech Tools > Create Custom Library
1.2. Enter a valid library name

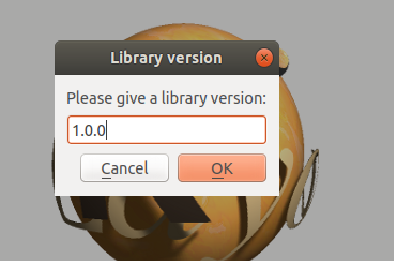
1.3. Enter a valid library version number
1.4. Enter a valid library description

1.5. Custom library content
If the library has been successfully generated, a new folder inside the AlcyonPDK pymacros folder should appear.
In this example, we will assume that a library called basics has been created. A new folder with the following content will be found:

This drawers folder is where the user must place the library’s Drawer classes
The library configuration json file should look like this:
 {
"version": "X.x",
"name": "basics",
"description": "Basic Library"
 }
2. Building Block Creation Tutorial
This section shows how to create a new building block by using Klayout’s shapes (e.g. polygons, paths, etc).
New blocks can be also built from other predefined blocks. The example mmiDrawer.py shows how to create a building block (conventional MMI2x2) from other basic components of the Alcyon-Basics library (waveguides, tapers, bends, etc).
It is strongly recommended to use the Jupyter Notebook drawers_visualizer.ipynb to visualize the Drawer Class and check that the geometry is as expected.
NOTE:
Drawer ClassesandPCell Clasessare described in depth in section 4 of this document.
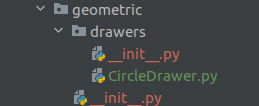
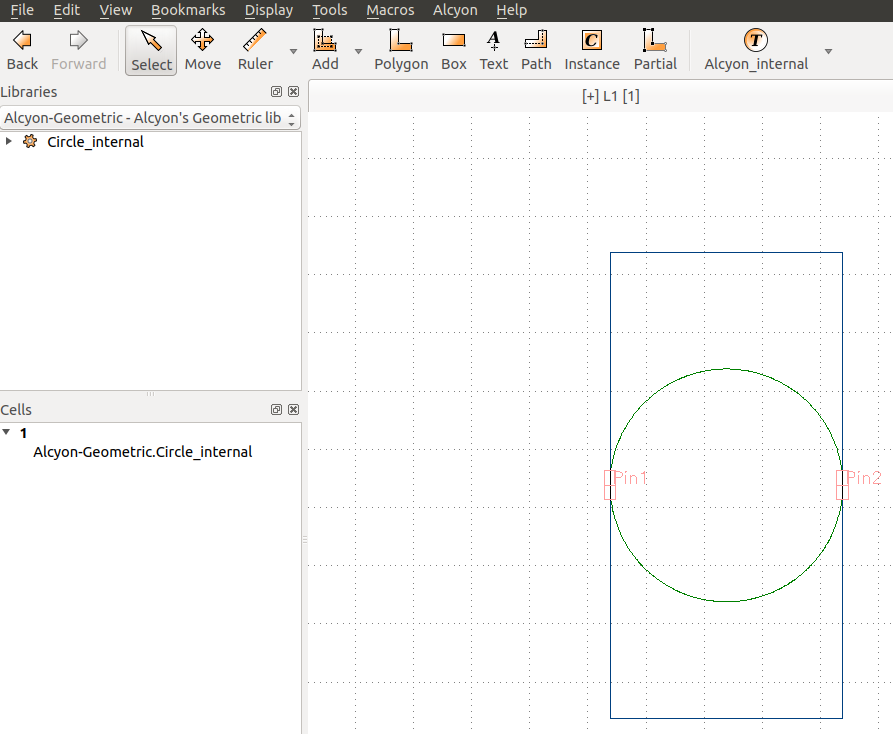
First, we will create a new building block called circle and place it in a new library called Geometric.
By doing so, the library Geometric will include the following cell:

Create a new file named CircleDrawer.py and place it inside the drawers subfolder of the libraries’ folder.
Please note that a single a single Drawer class must be coded for each custom component in a library.
First, import the
BasicDrawerclass:
import pya
import numpy as np
from AlcyonPDK.pymacros.misc.base_classes import BasicDrawer
NOTE: should your AlcyonPDK repository/folder name be different, replace AlcyonPDK appropriately. For instance, if your AlcyonPDK repo folder is named AlcyonPDK_Beta, then the above lines would be replaced by the following:
import pya
import numpy as np
from AlcyonPDK_Beta.pymacros.misc.base_classes import BasicDrawer
Create the class. Its name must end with the word Drawer
class CircleDrawer(BasicDrawer):
    # Drawer which implements a circle

    def __init__(self, origin: tuple = (0, 0),
                 num_points: int = 100,
                 radius: float = 1.0,
                 outline_width=1.0):
        """
        Create circle
        Args:
            * **origin**: cricle's center
            * **num_points**: number of points
            * **radius**: circle's radius
            * **outline_width**: circle's outline width
        """

        self.origin = origin
        self.num_points = num_points
        self.radius = radius
        self.rotation = 0
        self.outline_width = outline_width
The draw() method is an abstract method, it must be overridden so that:
It returns
dict_of_shapes,outlineandlist_of_pins
First, we cast self.origin to a tuple if it is given as a pya.DPoint for safety. Otherwise, check whether it has been assigned as an iterable with 2 elements.
if isinstance(self.origin, pya.DPoint) or isinstance(self.origin, pya.Point):
    self.origin = (self.origin.x, self.origin.y)
else:
    try:
        iter(self.origin)
        if not len(self.origin) == 2:
            raise TypeError(f"Origin point must be an iterable with 2 elements")
    except:
        raise TypeError(f"Origin point must be an iterable with 2 elements or a pya.DPoint")
Next we generate the circle points that will be inserted in the silicon layer of the layout. Note that up to this moment, the center of the circle is the point (0, 0). These coordiantes are referred to the TOP cell’s coordinate’s system this cell will be inserted in.
# Circle points (first, centered at (0, 0))
c = np.cos
s = np.sin
pts = [pya.DPoint(c(theta), s(theta))*self.radius for theta
       in np.linspace(0, 2*np.pi, self.num_points)]

# Circle as a simple (without holes) polygon
circle_polygon = pya.DSimplePolygon(pts)
Then, we translate the points so that the circle’s center will be located at self.origin. We can also rotate the points, if a rotation angle is given.
# Rotate the points by the given angle (rotation can be = 0)
circle_polygon = self.rotate_paths(paths=circle_polygon, rotation_angle=self.rotation, rot_point=(0, 0))
# Translate the points to origin
circle_polygon = self.translate_points(paths=circle_polygon, dst_point=self.origin)
The cell outline is a bounding box with set upper and lower safety placing margins. These margins are intended to prevent placing cells
too close. Currently, only pya.DPaths, pya.DSimplePolygon or pya.DPolygon are allowed as outline shapes. As with the circle polygon, the outline is also translated and rotated.
# Outline (a box containing the circle)
# Currently, only pya.DPaths or pya.DSimplePolygon...
outline = pya.DSimplePolygon([pya.DPoint(-self.radius, -(self.radius + self.outline_width)),
                              pya.DPoint(-self.radius, (self.radius + self.outline_width)),
                              pya.DPoint(self.radius, (self.radius + self.outline_width)),
                              pya.DPoint(self.radius, -(self.radius + self.outline_width))])

outline = self.rotate_paths(paths=outline, rotation_angle=self.rotation, rot_point=(0, 0))
outline = self.translate_points(paths=outline, dst_point=self.origin)
Two contact points will be added at (-radius, 0) and (radius, 0). Given a contact point, its associated pin is generated as follows:
Generate a path centered at the contact point (Klayout generates a path from 2 points and a width)
This path initially has a rotation of 0º with respect to the x-axis
The distance in the x-coordinate between the two path’s points is 0.1 um
Rotate the path as desired
The get_pin_list() method is called with the following arguments:
points_w_larger_p0x: list containing those c_points which pin’s have their p0.x coordinate > p1.x (before the rotation)points_w_larger_p1x: list containing those c_points which pin’s have their p0.x coordinate < p1.x (before the rotation)
The rationale for separating points according to this condition (p0.x > p1.x) is to control the requirement that the first point of the related pin of a contact point must lie inside the cell outline.
However, a better approach can be taken by providing the outline shape to the get_pin_list() method and computing the path so that it is tangent to the outline at the contact point and placing its first point inside the outline.
# Contact points
c_0 = pya.DPoint(-self.radius, 0)
c_1 = pya.DPoint(self.radius, 0)

# Create pins from contact points
list_of_pins = self.get_pin_list(points_w_larger_p0x=[{"c_point": c_0, "r_deg":0, "width": .25}],
                                 points_w_larger_p1x=[{"c_point": c_1, "r_deg": 0, "width": .25}])
list_of_pins = self.rotate_paths(paths=list_of_pins, rotation_angle=self.rotation, rot_point=(0, 0))
list_of_pins = self.translate_points(paths=list_of_pins, dst_point=self.origin)
Finally, the draw() method must return a shapes_dict, the outline and list_of_pins.
The shapes_dict is a dictionary which maps a given list of shapes to a desired layer so that the designer can insert as many shapes in as many layers as she/he would like to:
shapes_dict = {pya.LayerInfo(1,0): [circle_polygon]}
The shapes in the list [circle_polygon] (which for this case is a list of only one shape) will be further inserted by the PCell code in the layer given by the pya.LayerInfo(1,0) object.
The return line should look like the following:
return shapes_dict, outline, list_of_pins
import pya
import numpy as np
from AlcyonPDK.pymacros.misc.base_classes import BasicDrawer


class CircleDrawer(BasicDrawer):
    # Drawer which implements a circle

    def __init__(self, origin: tuple = (0, 0),
                 num_points: int = 100,
                 radius: float = 1.0,
                 outline_width=1.0):
        """
        Create circle
        Args:
            * **origin**: cricle's center
            * **num_points**: number of points
            * **radius**: circle's radius
            * **outline_width**: circle's outline width
        """

        self.origin = origin
        self.num_points = num_points
        self.radius = radius
        self.rotation = 0
        self.outline_width = outline_width

    def draw(self):
        """
        Draw the cell/component
        1. The component is generated with c_0 at (0, 0)
        and with a rotation angle of 0 radians
        and with a rotation angle of 0 radians
        2. All paths are rotated around c_0 (0, 0)
        3. All paths are translated to desired self.origin, so c_0
        becomes self.origin
        Return:
            * **list_of_paths** (list): list of pya shapes
            * **outline** (pya.DSimplePolygon): cell's outline
            * **[c_0, c_1]**: list of contact points (pya.DPoints)
        """
        if isinstance(self.origin, pya.DPoint) or isinstance(self.origin, pya.Point):
            self.origin = (self.origin.x, self.origin.y)
        else:
            try:
                iter(self.origin)
                if not len(self.origin) == 2:
                    raise TypeError(f"Origin point must be an iterable with 2 elements")
            except:
                raise TypeError(f"Origin point must be an iterable with 2 elements or a pya.DPoint")

        # Circle points (first, centered at (0, 0))
        c = np.cos
        s = np.sin
        pts = [pya.DPoint(c(theta), s(theta)) * self.radius for theta
               in np.linspace(0, 2 * np.pi, self.num_points)]

        # Circle as a simple (without holes) polygon
        circle_polygon = pya.DSimplePolygon(pts)

        # Rotate the points by the given angle (rotation can be = 0)
        circle_polygon = self.rotate_paths(paths=circle_polygon, rotation_angle=self.rotation, rot_point=(0, 0))
        # Translate the points to origin
        circle_polygon = self.translate_points(paths=circle_polygon, dst_point=self.origin)

        # Outline (a box containing the circle)
        # Currently, only pya.DPaths or pya.DSimplePolygon...
        outline = pya.DSimplePolygon([pya.DPoint(-self.radius, -(self.radius + self.outline_width)),
                                      pya.DPoint(-self.radius, (self.radius + self.outline_width)),
                                      pya.DPoint(self.radius, (self.radius + self.outline_width)),
                                      pya.DPoint(self.radius, -(self.radius + self.outline_width))])

        outline = self.rotate_paths(paths=outline, rotation_angle=self.rotation, rot_point=(0, 0))
        outline = self.translate_points(paths=outline, dst_point=self.origin)

        # Contact points
        c_0 = pya.DPoint(-self.radius, 0)
        c_1 = pya.DPoint(self.radius, 0)

        # Create pins from contact points
        list_of_pins = self.get_pin_list(points_w_larger_p0x=[{"c_point": c_0, "r_deg":0, "width": .25}],
                                         points_w_larger_p1x=[{"c_point": c_1, "r_deg": 0, "width": .25}])

        list_of_pins = self.rotate_paths(paths=list_of_pins, rotation_angle=self.rotation, rot_point=(0, 0))
        list_of_pins = self.translate_points(paths=list_of_pins, dst_point=self.origin)

        shapes_dict = {pya.LayerInfo(1,0): [circle_polygon]}

        return shapes_dict, outline, list_of_pins
3. Adding new building blocks to a library
This section describes how to add a new building block into a library from a Drawer class.
As described above, each component requires a file with a Drawer class. To incorporate the new block into a Klayout library, place the python file in the drawers subfolder of the desired library.
NOTE: Adding New blocks to the Alcyon libraries must be avoided, as these libraries may be updated and the user’s files deleted.
The Pcell Classes and registration scripts are automatically generated from the library’s content
running the Alcyon’s Technology Generation Tool.
The user will notice that a new file and a new folder have been created inside the library folder:
pcells folder, which stores the automatically generated code of the Parametric Cell class
register_lib.pyscript, which registers the library into Klayout
NOTE: If no
Drawer Classesare coded and manually added to the drawers folder in the library, no components will be registered by Klayout.NOTE: Whenever any new
Drawer Classesor custom libraries are added to the PDK, the Alcyon’s Technology Generation Tool must be run again.NOTE: It is highly recommended to check that the Drawer is working as expected before registering it. To do so, use the Jupyter Notebook
drawers_visualizer.ipynb(see section 5).
Finally, restart Klayout.
Open Klayout in editor mode and check whether the new library and the cell are available. Also check if no errors are raised when placing the circle cell in a new layout.
4. Drawer Classes and PCell Clasess in depth
Each
Drawer Classcontains the methods for building each component’s shapes and contact points.The
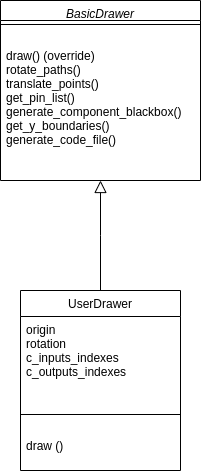
Drawer Classesare NOT directly imported by Klayout. Instead, a different set of classes, thePcell classes, will use them to build the parametric cells that are registered by Klayout.As illustrated in the figure bellow, the user defined drawer inherits from the
BasicDrawerclass (provided in the PDK) and must override itsdraw()method.
The overriden
draw()method must returnshapes_dict,outlineandlist_of_pins, where:shapes_dictis the list containing the cell shapes (geometries) list and their related layer mapping. Therefore, the keys of theshapes_dictmust bepya.LayerInfosand their associated values lists ofpyashapes.outlineis the box (pya.DSimplePolygon) that contains the cell, usually with an upper and lower safety margin.list_of_pinsis the list of pya.DPaths that constitute the cell’s contact points. A pin is a path centered at the desired location of its contact point and which extends 0.05 um inwards and outwards from the cell’s outline. The first point of a pin’s path should lie inside the cell’s outline, thus, the last one should lie outside.return shapes_dict, outline, list_of_pins
NOTE the
BasicDrawerclass already includes the member functionget_pin_list()which generates the list of pins from the list holding their contact points.
Illustration of cell's pin
Every drawer class name must end with the word Drawer, for instance,
SomethingDrawerEach user defined drawer must be included in a single file with the same name as the class. For instance, the
CircleDrawerclass code must be written in a single file namedCircleDrawer.py

Pcell classesare the python classes that inherit frompya.PCellDeclarationHelperand are registered by Klayout.The user does not need to implement the code for the
Pcell classesof a custom library.The
Pcell classesare automatically generated by running Alcyon’s Technology Generation Tool.The user does not need to code the registration scripts that Klayout needs to register the custom libraries, they are also automatically generated.
5. Coding and visualization examples
The notebook drawers_visualizer.ipynb allows to visualize the geometries described in the draw() method of the Drawer classes and is of great help when programming new blocks, since it allows the user to check if the geometry of the block is as expected or if the geometry varies accordingly when changing the input parameters.
Said notebook includes pre-coded examples to try out, and can be edited to add new user-created drawers. It can be found in the AlcyonPDK tech folder:
Ubuntu: ~/.klayout/tech/AlcyonPDK/notebooks
Windows10: C:Usersuser_nameKLayouttechAlcyonPDKnotebooks
NOTE: It is strongly recommend to check the drawer classes with the notebook before registering the libraries in Klayout.
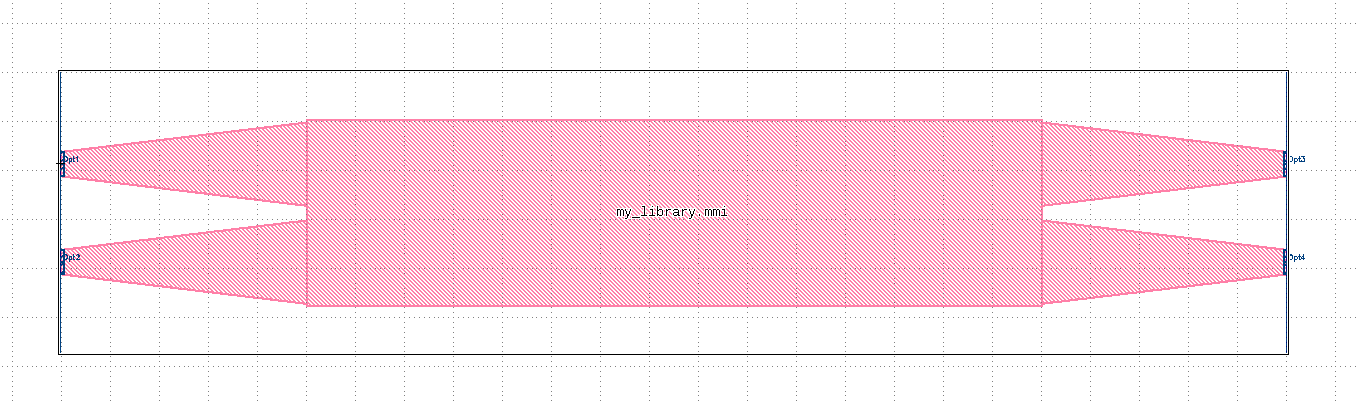
5.2.1. Conventional MMI2x2
The drawer class found in AlcyonPDK/notebooks/mmiDrawer.py shows how to code a block that is comprised of other blocks taken from the libraries (e.g. Alcyon-Basics). This blocks combine input and output ports made of taper waveguides imported from TaperDrawer.py with a multimode waveguide made by using Klayout’s shape pya.DPaths. Note that there are multitude of strategies to create the desired design.